Take Off Your Coat and Stay Awhile: Entryway “Board and Batten”

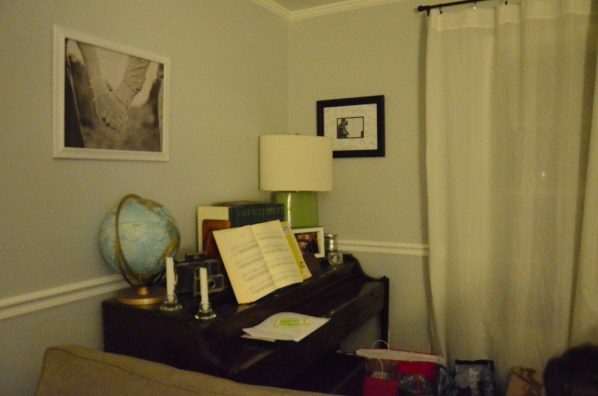
Welcome, friends! I say that because today we’re talking about the very. first. thing. you’ll see when you come into our house. I know that some people are blessed with a big beautiful coat closet but umm, our entry/living room is a little odd. When you come in you face this wall. Like, right in your face.

c4fa3-101_0548

In fact, you have to come in, walk to the right, and close the front door to get to our roommate’s bedroom (to the left). It’s craaaaaazy squished in there. We DO have a coat closet, but it’s on this awkward angled wall and it’s built with an angled wall (where the closet door is) so there is one awkward little shelf, which we actually moved a few years ago.

entryway_coat_closet

It holds more coats now than it once did, but it still only holds about…my coats. I have a jacket/coat problem. I look really cute in coats. That’s the problem. Also, we needed it to house some other random things…I think it holds air filters and our little spot-treater steam machine thingy..and extra Ikea throw pillows that don’t have covers…and beach towels? Guests don’t need to be seeing all of that, right? Plus, like I said, really inconvenient to be opening ANOTHER door when you don’t even have the first one closed.

I could never really figure out what to do with that wall right as you come in the door. I think at some time in my roommate history it may have had some kind of picture hanging on it, but that could be totally made up in my mind. Well, I kept shopping around for cool entryway ideas and I found one at House of Smiths. Shelly (co-author of HOS) had a great idea to peek behind her existing closet…and she found the mother lode. She had space to expand on each end and create this cool recessed bench with storage above and below (seriously, go look at it- it’s incredible!). So, I thought, “Maybe the coat closet could become and entryway and we could just tear out that wall, push it back to the depth of the closet…and voila!” Um. No. The closet still has a hole where I cut into it, reached through…and knocked on the wall of our roommate’s shower. That was unfortunate. {note to self: patch that wall!}

coat_closet_hall

Our house has a weird floor plan, obviously, because his shower is right up against the wall you see as SOON as you come in the house. One day I’ll have to share floor plans or something because this house is hard as heck to explain to people. Even once people have been inside the house, they don’t realize where all of the doors lead. In my head that sounded really creepy and was followed by, “Where DO all the doors lead? mwahahahahahahahahaha!”

Like some sort of crazy fate, John & Sherry from YoungHouseLove posted a Reader Redesign by a photographer named Sada Lewis & her husband. Well, to say that I fell in love with her idea would be an understatement. I had seen similar ideas on other blogs for hallways and mudrooms, but we don’t really *have* hallways or mudrooms. Now my house sounds totally crazy. There’s a shower wall as soon as you come in, no formal entryway/mudroom space, and NO hallways- at all. We actually live in a clown car.

Our entryway is not nearly as long as Sada’s so, we altered the plans a smidge and used different sized boards. We didn’t want anything as big as a 1″x 4″ or a 1″x 6″ for fear it would look too heavy and overpower our narrow little baseboards. In all of my amazing design and technical prowess, I drew up some “blueprints”.


blueprint_drawing_entryway

blueprint_directions_entryway

Oh yeah, we also had to remove the chair rail that you saw up there. That is the worst and really makes the drywall  hard to paint over. We got it as smooth as a baby’s bottom and it still showed up through the paint…so we had a random step that the normal person without chair rail wouldn’t have to do.

spackle_after_chair_rail

Our supply list was:

1″ x 3″ x 6′  (6)

trim molding (one piece)

white semi-gloss paint (Oh yeah, gotta repaint all of the trim in the house, too. Sweet.)

circular saw (It’s what we have, but you could ask Lowe’s/Home Depot to cut for you.)

Kreg Jig

Drill

Countersink bit

Anchors with toggle bolts

Wall anchors

caulk

wood filler

regular ol’ drywall spackle

That seems like a lot but we had…almost everything. Just like with our rolling pantry, we originally bought the wood and then let it sit somewhere unsafe for long enough that it had warped and we would be unable to make it level. Genius. We also needed screws, but we had everything else left over. The paint was from the rolling pantry and…some other project I don’t remember, maybe the mirror? That’s beside the point.

At the bottom of my blueprints, I had written steps. Some of these we followed well. Others didn’t really matter if they got messed up or didn’t exactly match my blueprints. I think I swapped the order of hanging some of the boards between the drawing and the steps because I realized it would look less choppy or something.

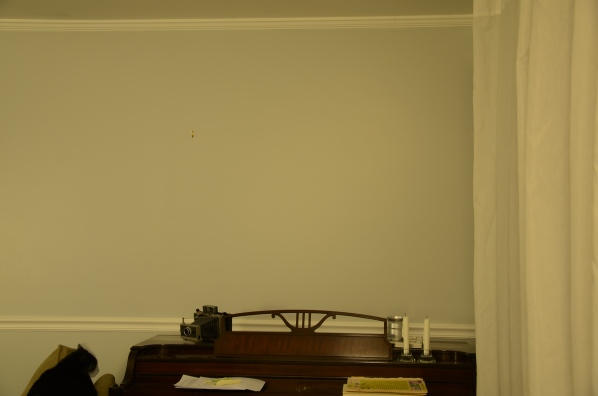
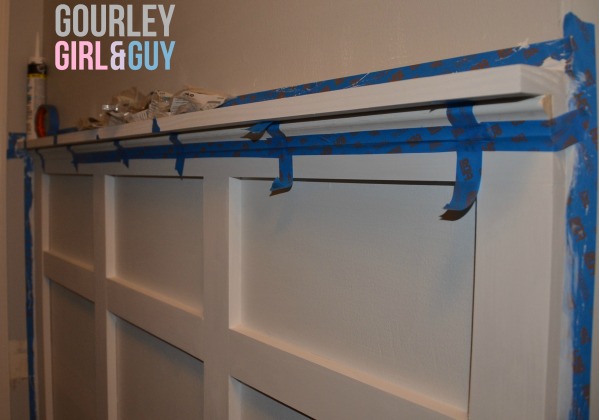
1. Measure the length of your desired entryway wall and cut one of your boards. This will be your top horizontal. (Sorry, the pictures are grainy. It was very dark, but I couldn’t wait to get better photos.)

first_horizontal_and_vertical

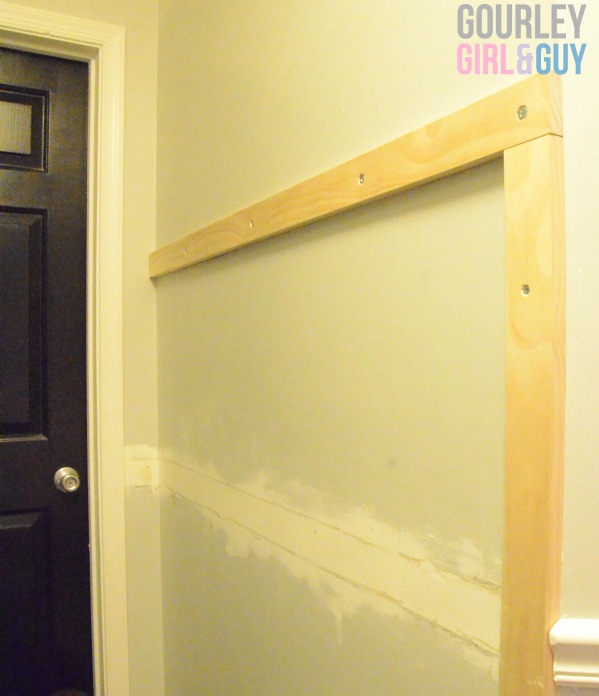
2. Cut a second board exactly like your first one. This will be the display “shelf” that rests on top of your horizontal board. Set aside.

3. Using wood screws (for studs) and toggle bolt anchors (for drywall), mark your wood, drill holes (with countersink bit!), and insert anchors (if necessary). Because our wall backs up to a shower and closet, the studs are in weird places so we had one side with lots of studs and one side with none. It was bizarre.

4. Measure from the bottom of your installed horizontal to your baseboards (vertically). Cut four boards at this length. Attach your outside boards first. This is where the job started to be ridiculous because our corners were obviously not square and one of our walls curves so the boards popped out…but we’ll address that later. For now, we just attached them as best we could and got them tightly secured to the wall. You could also cut the bottom edge of your vertical boards at a 45 degree angle (we used a miter box) so that they don’t sit out from your baseboards. We did this, but I’m not sure it was necessary from the angle we typically view this wall. Oh well, it doesn’t hurt. 🙂

45_degree_angle_baseboards

5. Measure the space between your two vertical boards. Figure out how many sections you want on your wall. I wanted 3 so I had 2 more vertical boards to place. Take the total measurement (ours was 47 inches) and subtract the width of ALL other vertical boards. Since I had two and they were 2.5 inches wide EACH, I subtracted 5 inches. This left me with 42 inches. Hallelujah, this can be divided by 3! So, since 42 divided by 3 is 14, I needed a space of 14 inches between each vertical board. We started from the left and attached a vertical. Then, we measured 14 inches from the right and attached the last one. I figured that if my measurements were wrong, the two side panels would be the same, even if the middle was a smidge larger. Guess what? I wasn’t wrong. Booyah!

board_and_batten_before_shelf

6. Cut 3 (or however many sections you have) boards to 14 inches (or the width of your sections between verticals) and attach them to the wall as well. Yeah, we ran out of screws/anchors and had to buy more. Upside? This joker is NEVER going to fall down. Like, we could climb it.

7. Screw and/or nail in top “shelf” board. We originally tried to Kreg Jig this, but with our wall being so curved, it was cuh-razy. We ended up just nailing it on top. Done and done.

8. Using wood glue and tape, secure your trim molding under the shelf. We actually forgot to do this until after we’d primed, but luckily our trim was pre-primed so it got painted on schedule with everything else.

trim_taped_and_glued

Once the glue is dry, remove the tape and move on to step 8.

trim_tape_removed

9. Fill…and sand…and fill…and sand…and run your hand over the wood to see if it feels like a baby’s bottom…and sand…and fill…and sand…and vacuum. every. surface. ever. Our downstairs is all open, not as in open concept, but as in, no doors between rooms. The only doors close off our coat closet and our roommate’s bedroom/bathroom. Therefore, every surface in our living room and kitchen is COVERED in sanding dust. I mean, I vacuumed…ish…but STILL. It is EVERYWHERE. I mean, look at those countersunk screws! There was a lot of filling and sanding.

countersunk_screw_heads

10. Now, prime. We did two coats of primer because the wood was so brand new and we did sand in between coats.

ready_for_paint_with_text

11. When you’re finally done with all that crazy (bonus points if you had to also put drywall spackle in a big huge crack because your corners aren’t square- high five!), paint the heck out of that. Sand between coats with some fine grit sand paper. That entryway will be the smoothest on the block! *I also chose to paint my baseboards (since the whole house’s trim needs semi-gloss) and quarter round, which has been wood-toned since I moved in…almost 10 years ago…

{11.5} Bonus steps: We realized that where we had removed our chair rail to start this project, there was just NO saving the drywall. I mean, the drywall is structurally fine, but there is just no amount of sanding that will make it *look* smooth. It feels fine. SO, we went back and added a second row of horizontal boards to disguise that little guy instead of skim coating. It’s a million times better, than before. We hung it first, filled/sanded, filled/sanded, primed, painted.

entryway_chair_rail_coverup

12. Caulk. Now, you  might reverse this. We actually do have paintable caulk, but I actually didn’t see all of the spaces that needed caulk when the materials still appeared mixed (and knew I wouldn’t) so we bought paintable white caulk and chose to caulk at the end.If the whites ever look different, it’s paintable. I can go back and paint over it. Here are some examples of how much better it looks with caulk. 🙂

Before caulk there was a pretty big gap that I mentioned above toward the top of the board & batten where our corner wasn’t square (it got thinner as you went down the wall). We went back with caulk later and it looks WAY better…not perfect, but WAY better.

corner_gap_entryway

And after, still not *great*, but it looks way better in person than it does in the picture and our entryway light doesn’t do me any favors, hah.

caulked_gap_entryway

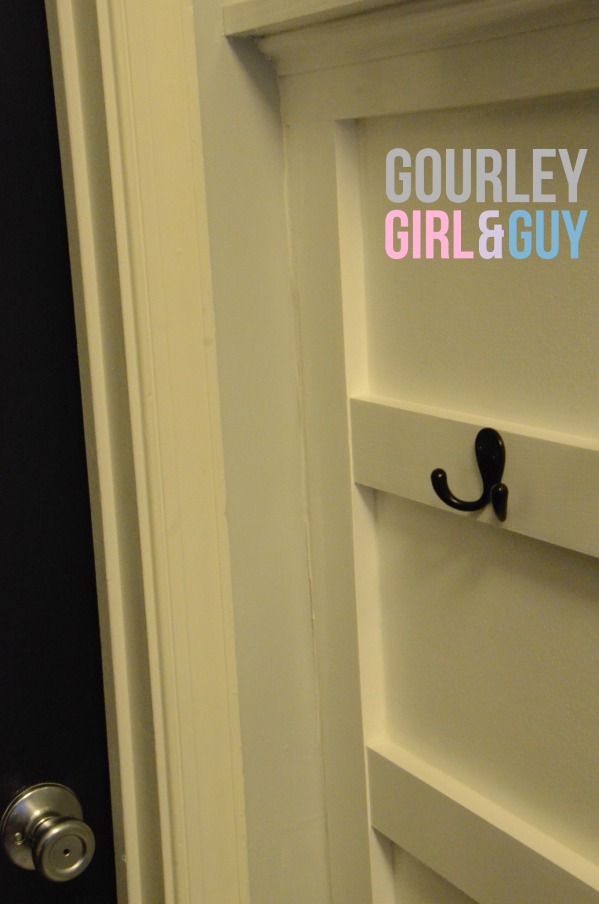
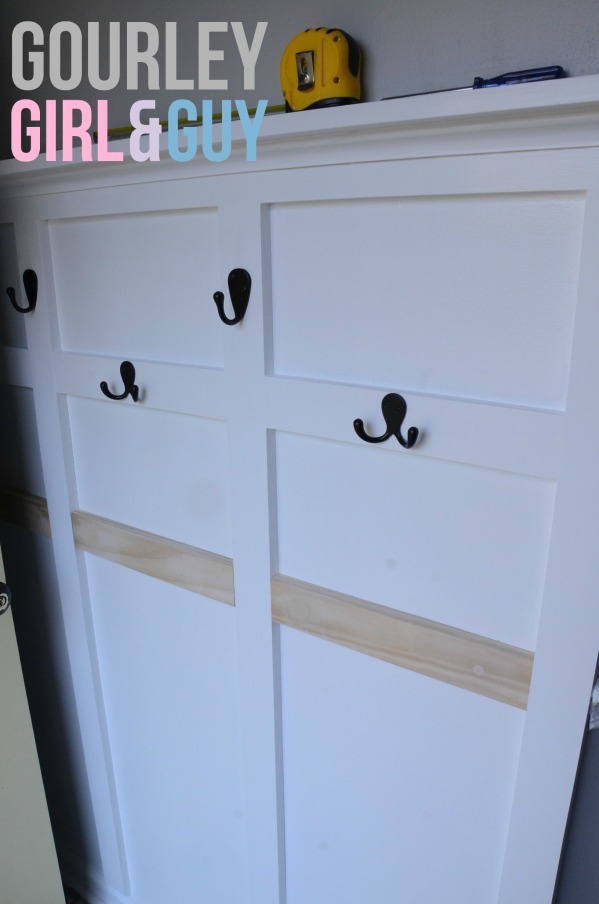
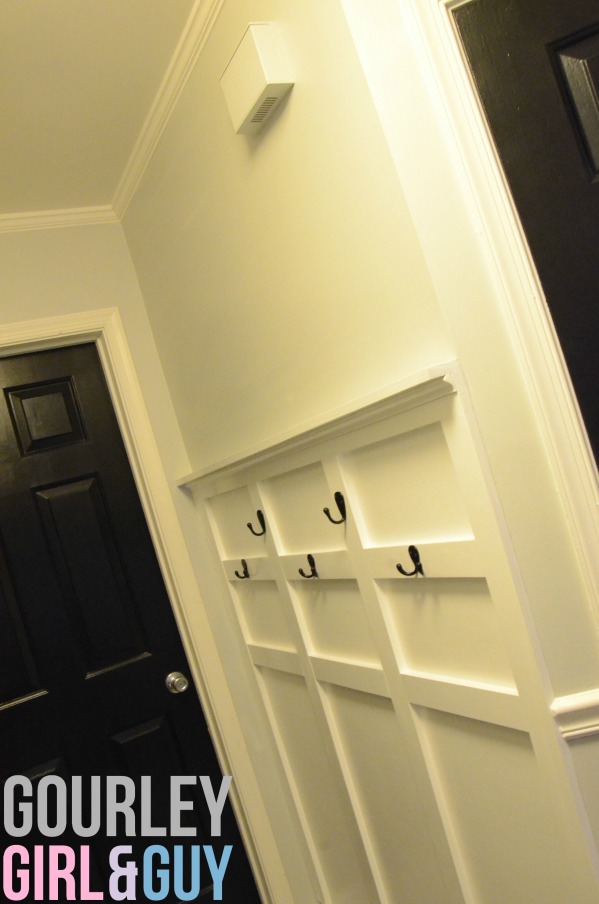
13. Pick out cute hooks (ours are from Home Depot), put them in place, and get to decorating that cute shelf that now welcomes everyone into your home! 🙂 Bonus points if you invite over your neighbors so they can pet your entryway and be jealous of its smoothness!

**For EVEN MORE IRRELEVANT bonus points, while you’re doing wall touch-ups, paint your alarm box! It looks a bajillion times better!**

finished_entryway_and_painted_alarm

I took some pictures with flash, too. It was so dark outside that there was no natural light to be seen for the foreseeable future. It helps to see the true colors of the paint and appreciate the contrast of the crisp, shiny white! 🙂

finished_entryway_flash

entryway_complete

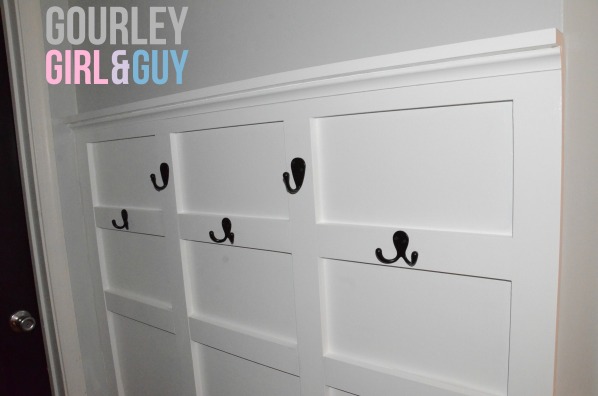
I also realized, while taking pics, that the hooks in the middle make a face…like a teddy bear face. Am I the only one who sees that?

entryway_hooks_face

I think the true cost of this project was about 30 bucks. We had to buy the wood (but I’m only counting that once since we messed it up, but will use the other as scraps) and screws/anchors. We had everything else on hand. We DID buy new drill bits because we got the new drill that I can’t. stop. talking. about. for my birthday and didn’t have the drill bit set, but that doesn’t count as exclusive to *this* project. I’m pretty pleased at the bang for our buck and also that our guests have places to hang coats/bags! Hooray for a more welcoming home in 2014! 🙂

Now, how about YOU? Anybody else have a phenomenal mudroom that I can drool over? How about some place to drop your crap that guests don’t have to see? Am I the only one who sees the face in the hooks? Anybody tried board and batten or sprucing up the entryway? Anybody? …Bueller?

Accessorized reveal with *daytime* photos coming this weekend! Hooray!

Rolling Right Along: Our New Rolling Pantry

Our kitchen has the problem that I hear SO many other people have as well: not enough storage. We have two-ish walls of cabinets/appliances. Literally. Fridge, skinny cabinet, stove, corner cabinet, sink, dishwasher, end skinny cabinet. A 3rd wall is our laundry closet and the 4th is a window nook and some floating shelves we’ve added with an antique cabinet (hallelujah, more storage) on that wall that we added in spring of 2013.

AGES ago, I was reading IHeartOrganizing and found a Reader Space by Classy Clutter. And by ages ago, I mean, at the end  of 2012. Truly. We bought these supplies on Super Bowl Sunday (like, February 2013) and finished it like, January 5, 2014. Punctual is NOT my middle name.

This is the plan, by Mallory of Classy Clutter. Her plans are very detailed eloquent and, in fact, this “blueprint”, as she calls it, is what had me at, “Hello.” I mean, it’s SO DETAILED, right?!

Can Organizer PLANvia

I’m going to start this off by saying that we altered the plans. No, that wasn’t on purpose. Yes, I’m severely type-A when it comes to a plan, but my sweet husband got tired of all of the supplies sitting in the floor and went about it in such a way to make it the “most stable” (without realizing I had pinned the plans on pinterest). **Most stable is NOT a reflection on Mallory’s original plan, but more Chris’ opinion when he didn’t realize there was a legit plan from which to work.**

Our two middle shelves are spaced further apart, a.k.a taller, than the others. That is because the middle board braces the whole thing. Spacing the shelves out equidistantly would’ve kept there from being a middle brace in the “ladder” structure of the rolling pantry. I just figured he was finishing a project I begged him to start and then dropped…so, I can’t complain. This is the best picture I have to show you that. I truly thought we took photos of this as we went along, but it’s been almost 12 months so, no surprise, I can’t find them. This picture is well past most of the first steps of her plan, but I wanted you to see what I meant about shelf spacing.

rolling pantry frame

We also built the frame and then put the beadboard on the back…then inserted shelves. This was for a few reasons. #1- We jacked it up the first time and the wood sat outside for so long (note: do projects WHEN YOU BUY THE SUPPLIES) that the wood warped and we had to buy new shelves. #2- We decided to put the shelves in using our Kreg Jig instead of screwing them in from the outside, like the plans instructed. (Dear Kreg Jig, We love you. Love, GG&G) The 4 outside boards were still attached with screws coming from the outside of the structure since we had done them first. In fact, when we started building this, we may not have even figured out the Kreg Jig. This is what happens when you complete projects ELEVEN MONTHS after you start them!

So, basically, we built the whole thing once, took all of the shelves out, built it all again (with the Kreg Jig) and THEN filled, sanded, painted, sanded, painted, sanded, painted, drilled for dowels, painted dowels, added wheels, and added a handle! Seriously, read Mallory’s blog for better plans. I couldn’t even pretend like I was as well thought-out as she. I was just really psyched to clean out a cabinet and dump it all in to this guy!

I do have to brag on my sweet husband. He found a box from…something(?) that had one of those unnecessary cardboard flaps on the top. You know, the ones where you open the top and then you have a flap that opens to the left, one that opens to the right, and THEN you get to see the product? Well, this one had holes in it and we may NEVER RECYCLE IT. It is perfect for drying painted dowels!

drying dowels

True life: All I did was inspect, take photos, and add the handle. I was darn proud of that handle, by the way. It was my first time using my birthday present (our new Ryobi one+ drill) and it is THE BEST, let me just say. Here he is, all decked out with his spices and bottles!

pantry_stocked

Did you SEE that handle?! That is some quality craftsmanship! 🙂

We currently have him to the right of the refrigerator, but are in serious talks to move him to the left…we just have to move the fridge. As of right now, here’s how he looks when pulled all the way out from the cabinets. It fits SO well between our fridge and cabinets. Yeah, it leans a little, but we can usually line it up pretty nicely and Chris can reach a lot of things (spices and olive oil) that he needs while he’s cooking. We even have room to grow into it AND we have cabinets to rearrange! I know that the little guy isn’t built perfectly and we didn’t fill every nook and cranny with wood filler, but for this house at this time, he’s perfect. Hopefully we’ll have a kitchen with amazing storage or at least a more customizable layout. Also, maybe one day I’ll clean up the splashes of spaghetti sauce before I take photos. Nah, probably not. And that spaghetti was DELICIOUS. 🙂

pantry_pulled_out

Aaaaaand, here it is pushed in by the refrigerator. If you’re thinking, “OH MY GOSH HER FRIDGE IS SO CLUTTERED?!?!!?!??!!” You would be right. That’s the next order of business once I snapped these photos. Well, that and painting over the yellow, cleaning and repainting the cabinets, and tiling a backsplash. So, not really “next”, per se.

pantry_in_place

In summary, I love the Kreg Jig. I love the Ryobi one+ drill. Follow Mallory’s plans at Classy Clutter for legit directions and to see her SUPER cute chevron background. We didn’t paint a pattern/design on ours because we’re re-doing the kitchen decor/scheme/painting this year (eeeeek!!!!!) and I wasn’t sure what would go with it. I may punish myself and go back and do a stencil or something later. I’ll keep you posted.

Is this adulthood?! Being excited about moving fridges, tiling a backsplash, rearranging cabinets, and clearing off counters?! Ugh, I’m lame.

What have YOU done for secret storage? Please share tips because our kitchen is still teeny-tiny and we need all the help we can get! 🙂

P. S. Mallory from Classy Clutter? You’re my hero. Thanks for giving me so much inspiration! 🙂

“I see a white door and I want it painted black.”- Painting Our Interior Doors Black!

I hope normal people understand the Rolling Stones reference in the title of this post. My husband started singing this song as soon as I went to start this project, looked at me from the bottom of the stairs and said, “Blog post title!” When he comes up with the title, I’m so proud that it sticks. #bloggerhusbandpoints

OK. So, this was a terrifying project. This was one of those love-it-or-hate-it projects. I have seen some REALLY beautiful doors on pinterest (where you should follow me!) and the backsides were…painted black. The first glimpse I saw of this was from the lovely Carmel at Our Fifth House. She painted both her sliders AND the back of her front door black. You can see that in the photos below. Sidenote: Carmel, if I didn’t source these properly, feel free to give me a virtual stink eye and/or to write me and tell me how you want it fixed. 🙂

black sliding doors

See how she did it here!

I mean, WHAT?! Those are gorgeous…but it didn’t quite sell me (because our sliders are ugly and not super paint-able) until she did her front door, too.

blackinteriordoorentryfoyer

Find out more about her beautiful front door here!

I mean, the DRAMA! I’ll be honest. I didn’t then spend hours pinning different black doors all over the place. I was preeeeetty sold and I told Chris. He wasn’t so sold. Don’t get me wrong, he thought Carmel‘s house looked AMAZING, but he wasn’t sure *our* house could pull it off. Let’s just say our house isn’t as… lovely, distinguished, open, gorgeous, light as hers.

Obviously, I did what any wife would do. I harped on it. Every time we talked about painting something I said, “…and of course that door will be black on one side…” until he finally relented. in fact, when I met Carmel at Haven, I said, “Thank you for having the black doors that helped me convince my husband we could handle it.” I know what you’re thinking, “How does any self-respecting blogger NOT love meeting you, Jessica?!” I truly don’t know.

Well, we got REALLY fired up when Ace Hardware gave away free quarts of paint. We just thought, “Hooray! We can do this for free!” On top of that, a parent from my school (whose kids I love-love-love) called me and said, “I know you do things at your house and there’s free paint. We’ll redeem our coupons for you, too.” WHAT?! I was now looking at a possible FOUR QUARTS- THAT’S ONE GALLON, PEOPLE?!- of free paint!

Too bad they average 40 quarts per store (read the fine print, people!) and I don’t wake up until 11 a.m. on summer Saturdays. They were all out when I got there.

However, my darling husband, in the interests of actually having me complete a project this summer keeping me sane said, “Let’s just go to Home Depot and get a quart of the paint anyway.”

DO YOU HEAR THOSE ANGELS SINGING?! This man bought me PAINT?! True love.

We went to Home Depot and picked out Onyx by Glidden in a semi-gloss finish. I love a good semi-gloss in places semi-gloss isn’t supposed to go. It’s like where the sun don’t shine, only…where the ceiling/doors/trim DO shine. It’s just so…shiny! I love it. A lot. I decided to paint the upstairs doors first. In our little tiny hallway/alcove there are five doors. FIVE. It’s probably less than 30 square feet and FIVE DOORS. To date, I’ve finished three. Don’t judge.

First up, our guest room door. Please don’t judge the spackle on the wall in the crack from where our house settled, the boxes on the floor because this room is stacked 3 feet high with stuff to…deal with, or the random assortment of junk in my hallway. A lot of that is gone now, except for the spackle and the stuff in the room. But! Look at that LOVELY door!

guest-room-door-white

Next up, the linen closet door (the one on the left in the above photo) which is maybe the dirtiest door ever. Why? I have no idea. Three grown adults live here and only two of us ever come upstairs. Why was my door SO DIRTY?!

dirt-linen-closet-door

Lastly, but possibly my favorite, our bedroom door:

Sorry I had to turn the light on for this picture to look even…tolerable. Also sorry for the piece of ceiling HANGING DOWN from the corner. Yes, we fixed it once. Yes, it leaked again. Yes, the leak is fixed FOR REAL now.

bedroom-door-white

So, first I sanded our doors (I forgot to take a photo because, well, I don’t have but so many hands-in fact, just 2), wiped them down (the dust was unbearable, wish I could blame the sanding process instead of my housekeeping skills), and then got to painting. I realize that I probably should’ve used primer and deglosser, but I realized that after there was already a coat on the doors. That being said, I painted more doors downstairs (to come later) and the paint adhered VERY well because they were more recently painted. These doors took three solid coats, but they really do look fantastic…just you wait!

I try to follow an order when I paint doors like this (which has happened a lot in this house):

1. Around the panes and the doorknob with a short-handled, angled brush. I call it my Sherry brush. It is nerdy. I am aware.

2. With a cabinets/doors roller, I paint all of the horizontal sections of the door.

3. I paint all of the vertical sections, including the panes.

Now, a good blogger would’ve showed you a picture of the splotchy, oh-my-gosh-this-will-take-forever first and second coats.

I don’t claim to be a good blogger. I will however, show you the scariest step of all. The first one.

On night one of this project, I was sitting in our floor painting around our door panes when I said, “Honey? Does this black make it look like a crazy serial killer house?”

“No…not a serial killer…maybe Tim Burton.” Cute. Just the look I was going for. Here are the photos of the doors on the Nightmare Before Christmas.

guest-room-door-panes-black linen-closet-panes-black bedroom-door-panes-black

You’ll note that those photos are complete with bad lighting and no focus…just to creep you out a little further. You’ll also notice that I went rogue and didn’t tape off the bedroom doorknob. Watch out! I have a paint brush and I’m on the loose!

Here are the finished doors. I love how the white trim looks so crisp next to the shiny black doors. Did I mention I LOVE semi-gloss paint?!

black-bedroom-door

#hothusbandphotobomb Do you see how baggy his undershirt is? This man has lost a LOT of weight. I am so proud. 🙂

linen-closet-guest-room-black-doors

I’m not gonna lie, this was super simple and even though this was a love-it-or-hate-it project, I’m glad to say I don’t just love it. I L-O-V-E-lay-in-bed-and-gaze-at-my-doors-LOVE it. And my husband thinks it’s awesome, too. Now we just have to figure out what to do about all of this mismatched hardware. Brass on the linen closet, brushed nickel on the bedrooms- what?! Ugh.

Coming soon… Back In Black: The Door Painting Saga Continues with our remaining 5 unpainted doors! 🙂

Would YOU paint your doors black? What about navy? Laura from The Turquoise Home just used a stunning navy on the back of her front door. Check it out! 🙂

The Longest (& Worst) Project We’ve Ever Taken On…

**Warning:  This is wordy and I didn’t believe in focusing photos, apparently. I also didn’t own a tripod…and it was Christmas. So, be ready for Christmas in August! Woo!**

OK…so, we’ve admittedly never taken on a big whole-room reno. It’s not something we’ve ever been in the position to do (financially or otherwise). We actually live in a rented house, but not in the typical “renter” sense. When I was in college, my parents bought a house for my roommates and me to live in knowing I had 3 years left in school. My junior year, I moved out with my two lovely friends, Katie and Meredith, and we lived together for our last two years of undergrad. Then, my friend Greta moved in during my Master’s and my friend, Lauren moved in during my first year of teaching. At the end of that year, I was married to my first husband, then lived here alone, and finally, with Chris (and Jess for two summers…and Michael) for almost 3 years now!

My mom still owns the house, but we pay the mortgage and take care of most home-related things as best we can. She lives 2 hours away, so we’re usually in touch with professionals (like when our AC broke- worst summer ever) and try to do cosmetic things ourselves. **Funny story, when I first drafted this I had no idea our AC was going to be undercharged and not work AGAIN this summer!** Last summer, we decided to embark on the biggest DIY project to date. Luckily, at the end we still liked each other and like our house WAY more.

Mom paid for us to get all. new. floors. There may have been some squealing/dancing/merriment that ensued (not just from me). We went to Lumber Liquidators where the manager, Mike, was super helpful. He answered our questions, measured our square footage, estimated padding, and took Mom’s credit card # over the phone. He even taught me how to tell a credit card type from the first digit of the card number. I’m a nerd.

Now, before I give you a million details, please note that our floors don’t get a *ton* of traffic. Three adults and two cats live here, we mainly use one room (the living room), and we don’t plan on being in this house forever. We ordered a very thin laminate floor because we are…frugal…and we don’t regret it. (Our flooring was called Black Forest Oak, but I can no longer find it on the website! Sorry!)  However, this floor was slightly frustrating to install because it was SO thin that it didn’t “click” like they said it should. Also, it does chip super easily when you’re installing it. Now that it’s in, we’re not noticing any problems, but it was touch and go in a few places and I may or may not have used clear nail polish to make sure one corner stayed down. We weren’t sure if we would have enough flooring to use brand new pieces if we noticed defects so we tried to make do as best we could. **Update: we have TONS of this flooring left over, so overestimating is good…even though we still have extra boxes of flooring.**

Dear future buyers of this house, please don’t crawl around to inspect our floors. Please just buy this house as we’ve put very much love into it. K, thanks. Love, us.

OK, we started in Michael’s room because…he has the least amount of stuff in this house and it meant we had to finish it asap. Poor boy’s stuff was out on the back porch. We had torn out the carpet in Michael’s room before he ever moved in last June because…it had some cat pee on it and it was grossing me out. Michael lived on concrete floors for about two months before we started this little endeavor. I don’t have many pictures of this room because most of them are awful since we worked VERY late into the night with one tiny lamp. There are definitely spots where I would redo this room if we could/wanted to, but it wasn’t bad for our first room.

Some things that may be different from other floor-laying blogposts: we did NOT pull up baseboards. When we tore out carpets, there was TONS of space under the baseboards so we just floated the floor with some underlay in between the concrete and the flooring itself. This does use TONS of spacers. I mean, tons. It was crazy town how many spacers we were rotating around to do the whole room. **Tip: run your underlay opposite of your floor planks.**

This is maybe the best picture I got (during the entire 5 month process) that describe the color of our flooring. Yes, it took us 6 months. We couldn’t start until the end of July (by the time the floors came in and they acclimated) and then we went on 2 weeks of vacations and I started back to work the following week.

floor-michaels-room-color

Needless to say, I basically refused to live with no furniture for the first part of the school year. My saintly husband did many, many rooms by himself while I was at work. He’s a keeper.

**Helpful hint…don’t box yourself in with a 300 lb. piano.** Another helpful tip, never try to move said piano by yourself if you are a small girl.**

I did that once about 4 years ago and couldn’t walk for a few days. Whatever, I was still proud. I kept this awful photo just because it’s so funny that we shut ourselves into this room. You’ll note that the piano’s keyboard tray made a great dispenser of flooring.

100_1760

Aaaaaand, Michael’s room: check!

first-floor-bedroom-flooring

Nothing you can say will make me hate that wall color, as badly as I do want to repaint his room. It’s called Marmalade by Behr. And I love it. L-O-V-E-LOVE it.

We figured the next best place to do was our office/guest room because it’s a room we don’t need. This, however, meant that we had to start doing the upstairs and just keep on truckin’. Our entire upstairs has attached floors and we felt like putting transitions in every doorway would make the upstairs too broken up. Also, pulling carpet out of plywood=110x easier than out of concrete.

I don’t have a ton of photos of this process because it was pretty self-explanatory:

1. Pull up carpet/padding.

2. Pull up tack strip (the WORST).

3. Sweep everything up and clear the floor.

4. Start laying underlay in the opposite direction of planks and tape each strip together.

5. Start laying plans with spacers of about 1/4″ next to baseboards (check for level in case you have to shave a bit off).

6. Space them out so all of the joints aren’t RIGHT next to each other and get to layin’ floors!

7. Start cutting quarter round to your desired lengths, tack in with tiny nails, drive in enough to cover, go around every. thing.

8. Pass out on your floor. Amen.

So here is the guest room pre-floor:

guest-room-plywood guest-room-closet-subfloor

Then we did into our hallway and my sweet husband did my ENTIRE BEDROOM by himself while I was at work. What. A. Man.

So, we moved to downstairs: kitchen first, then living room (woof).

The kitchen/living room have the most photos because I was on Christmas break. Woo hoo! That was almost 8 months ago! *Worst Blogger Ever Award- Congrats to me!*

Again, Chris tore out all of the previous wood-looking laminate before while I was at work- no photos. However, you might wonder why we took thick laminate out instead of matching the rest of the house. Well, two reasons, one transition wasn’t properly installed and it would come up if you looked at it the wrong way. For two, it was improperly installed and had some water damage/bubbles in it. So yeah, later cherry-looking laminate!

Under that was…this:

kitchen-linoleum-floor

No, for real. What HAPPENED on those floors?! Gross. Tape remnants were everywhere, GIANT yellow spots (as you can see). What. The. Heck. So yeah, we weren’t sad to tear that up as well. We considered floating over it, but planned to do the new laminate in the living room as well and didn’t want to risk anything being “off” in terms of leveling.

Next step: Enlisting a teenager, a heat gun, a small spade, and a utility knife to tear up linoleum.

kitchen-concrete-heat-gun

Once all of the linoleum was up, we got back to work just like the other rooms. You might notice that we ran our floors completely under our appliances. We researched a million different ways (the previous floors only went partly under the appliances), but this floor moves easily so we wanted all surfaces to be secured. Not everyone will want that, but we made sure our appliances evenly distributed their weight and so far, so good! 🙂

kitchen-underlaykitchen-stairs-flooring
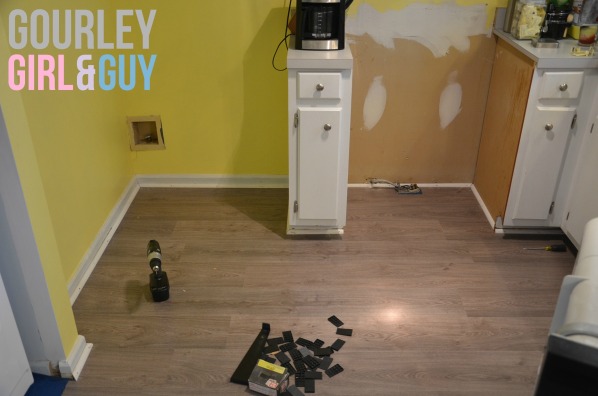
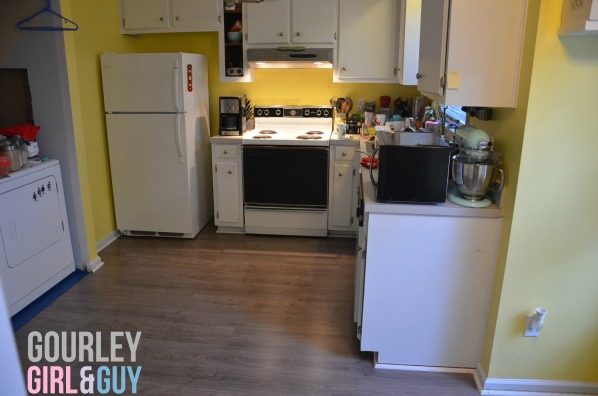
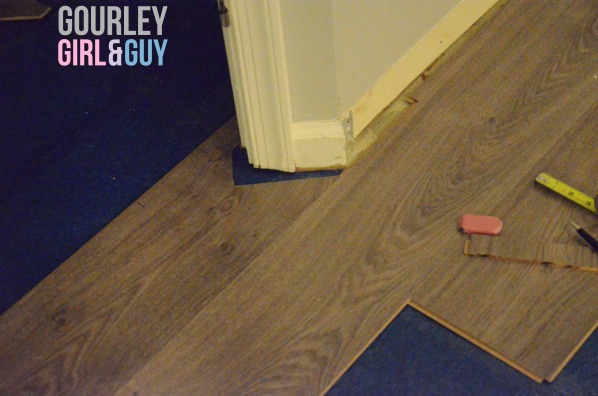
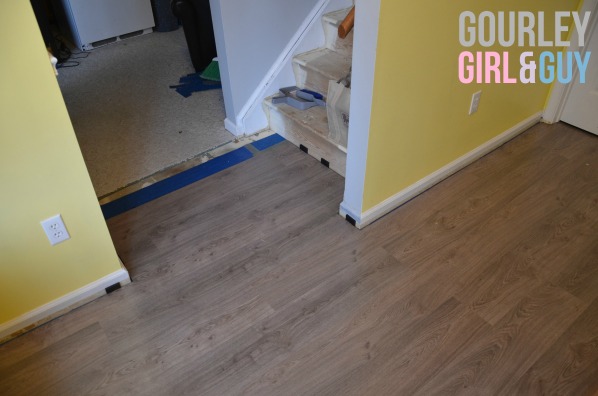
This is where our floors “meet” so to speak. We weren’t ready to go whole hog in the living room without doing quarter round in the kitchen. This also shows a pretty good representation of the floor’s color. I love it. It’s a sickness.

Then we installed quarter round (just like upstairs) and- tada!- a completed kitchen! 🙂

**Please don’t mind that the quarter round isn’t caulked to the baseboards and none of it has been repainted. We’re very good at not biting off more than we can chew at any one time and almost all rooms are being repainted anyway.**

quarter-round-kitchen quarter-round-fridge kitchen-flooring-table-wall kitchen-flooring-refrigerator-wall

See how messy the counter tops are? This is improvement. During the kitchen-floor-process, the living room looked like this:

living-room-floor-mess refrigerator-living-room-mess

This is keeping it real to the max. Our house was a flipping disaster. Thank goodness we could both stay home and work on it all day.

So, we FINALLY started the living room. For some perspective, our living room is about 12 feet wide at its widest point, but about 24 feet front to back. This room is ridiculous to style, decorate, orient, everything. Painting it the first time (the walls SUCKED in paint) took almost a week and a half because of the coats on the ceiling, walls, chair rail, crown molding, and baseboards. It was in.sane.

I’ll let these photos do the talking. Keep an eye out for our “sketchy surprise” from under the carpet, our “helper”, and the migration of our Christmas tree. I refused to take it down so we just moved it around. A lot.

carpet-living-room

ripping-up-carpet-living-room

razor-blade-living-roomchristmas-tree-concrete

living-room-underlay

closet-angle-flooring

duchess-living-room-floor

floor-living-room-christmas-tree

Is it just me or does anyone else LOVE how Christmas lights reflect on a hard floor as opposed to carpet? I sat and stared for a while. It’s the little things, right? No? Maybe that’s just me, then. OK.

floor-reflection-tree-living-room

Then, the BEST thing ever happened. Well, not *THEN* because it really happened on Black Friday…but RugsUSA had a HUGE sale. We got a rug that is normally $800 for about $200 bucks. I may have screamed/cried/squealed and even figured out my Christmas present when looking at the bank account to see if we could afford the rug. Sorry again, honey. But, it was worth it. We LOVE our rug. It is the Moroccan Trellis in Navy, though it doesn’t read quite as navy here as it does in real life. So, come over. We’ll put up a Christmas tree, lay on our cushy rug, and stare at the pretty Christmas light reflection in the floor. 🙂

rug-living-room-floorliving-room-couch-rugliving-room-rug-floor-tree

Our TV has been taken down since then and no longer hangs over the fireplace, we have new arm chairs that caused a whole rearrange of the living room, hung floating shelves over the buffet, and we moved the piano in (it sits where the tree is in the last photo) as you saw in my last post…so…there are clearly more posts to be had on this ever-changing living room. Seriously though, come over any time just don’t be shocked that our house is a disaster zone. In the meantime, anyone done any laminate flooring? We HATED it while we were in the midst, but any time we even think of talking about moving, we get so sad about leaving our floors. Stupid, but true! We love them and would do them ALL over again (and likely be much better at it the next time)!

Thanks for bearing with me through all of the pictures and ALL of the words! What was YOUR worst house project?! 🙂

stuff from my grandparents’ garage & wedding photos: finally making our gallery wall

So, most of my readers know me in real life and know that I have a tendency to “collect” things, a.k.a. hoard junk until it’s coming out of my ears. It just so happens that this has started working to my benefit. My grandparents are the original generation of DIY-ers. I’ve probably mentioned them before, maybe back when I was collecting items for my ladder or my floating shelves? I’m not sure. Either way, most of the things I have to display, like my insulators and jars, come from trips with Memaw and Pa or trips TO Memaw and Pa’s. Memaw and Pa comb Pennsylvania with us every spring looking through antique shops and shows. They have repainted all of the rooms in their house multiple times, including layers of wall paper, and they do all of their own (beautiful) landscaping. If my external hard drive hadn’t eaten all of my old pictures (I still can’t talk about it without getting emotional), I would show you how beautiful their house is. It is truly my favorite place in the whole wide world. Anyway, due to my subscription to Country Living and the magazine Flea Market Style, I’ve been getting a LOT of ideas. My grandfather listens intently when we look through magazines (although he sometimes acts like he doesn’t hear me when I make requests) and usually when I go back to their house, he’s found some old tool I “might want” for a project.

A while back, I don’t know how long, he sent me home with the head of a pitchfork, an old mirror, and some shears. I had no idea what I would use them for, but KNEW that I would use them. Months passed…as per usual. My “collecting” also coincided with us getting a roommate. Our friend moved into our downstairs bedroom, which only *really* housed junk and our piano. We made him live with the piano for too many months to mention (sorry, Michael) and FINALLY moved it out this spring! I wanted it to be a feature in the living room…and I also wanted to be able to play it. Don’t get me wrong, I’m pretty sure Michael would LOVE to wake up to me sitting on a piano bench in his room. That’s not creepy. At. All. So, we moved the piano out and I had a randomly hanging picture on the wall from a previous furniture arrangement. Are you ready to see how ridiculous this looks?!

before-over piano

So sorry that this makes my living room look like the darkest pits of you-know-where. Also, you can see my not-so-secret stash of CRAP that we “hide” behind the couch, making it clearly visible to anyone who steps foot in our door. I go back to work in less than 2 weeks, I should maybe get on that.

But you get the idea, the picture placement was NOT going to work anymore. So, one night, while watching The Facts of Life on TheHub at about midnight, I decided to pull down all of the things I thought would add to a gallery wall and start laying them on the carpet. This post is super short on photos (you’re welcome, obviously my photog skills are inCREDible), but it was really dark, really late, and I was working by myself until the installation.

The pile of junk in my floor included: the pitchfork, the shears, mirror, our wedding-photo-“guest book” frame, the hand-holding engagement photo, a new hanging light for free from the youth room at church (nobody wanted it, we asked), and one of our post-wedding photos from upstairs that we took down when our ceiling had a leak. So, after getting a few copies of the photos (almost 3 years ago) and buying a few frames (also almost 3 years ago), we basically spent nothing on this project. My favorite kind. Cheap.

We took everything off the walls, leaving us with this (I promise our walls aren’t gray/yellow/green, we just truly have zero. light. and I couldn’t wait for daylight):

blank-wall-over-piano

(Seriously, the more I look at the awful white balance and how crap-tacular this picture is, the more I want to throw up. The cat on the couch is its saving grace.)

I moved things around in the floor (over and over and over again) until I had an arrangement that I liked and then…I just started hanging things. I’m not good at rhyme or reason. I don’t do well mapping it all out with perfect 2″ intervals between frames. I do really well with throwing it on a wall and moving it (to hide the previous nail hole).

So, here’s where we are today (well, at night time)…

gallery-wall-over-piano

And this is daytime…not much better, but at least you can tell our walls are gray…ish. Also, why the heck is there a can of WD-40 on my piano bench? And why is it STILL THERE?! These photos were probably taken in like, April. I just can’t seem to clear out my giant junk pile long enough to take better photos. That’ll happen next-to-never when I do a house tour. I’m all for keeping it real, but sometimes I’m a little too “real” for you all to have to handle.

piano-gallery-wall-daytime

I love having tools from my grandfather’s garage displayed. I love that we FINALLY have some wedding photos up (but we have a canvas I can’t wait to hang!) and I love that it happened after midnight on a Saturday. That’s like the witching hour for me. I get all crazy and start doing projects. Chris LOVES it. Also, he figured out how to hang 99.9% of this stuff and just drove nails where I asked, so he is a rockstar, even at 1 a.m.

p.s, Ikea, why are are ALL of your mattes NOT AT ALL WHITE, even in WHITE FRAMES?! top photo doesn’t look as pee-yellow in person, but it sure does make me crazy in the head here. Crazy in the head isn’t a far cry from my “normal”, but still. 😉

Saving H2O…and Money :)

I have a freakish gift. Yes, it’s weird. No, I’m not proud of it. Many other people may say they have it, but I find that I’ve honed it to an unusual and unnatural skill level. See, growing up we had well water. To this day, I prefer well water over paying for my water and I still forget that I can shower when the power’s out. Dumb, but true. I have however, learned that I love showering in the dark. Strange, but true.

I remember my college roommate coming to stay for a few days over our first college break. Yes, we were that in love. A month apart made us crazy. That being said, we annoyed each other endlessly the next semester for about 2 months. No worries, we made up and are still in love today…and also happily married to wonderful men. We were sleeping in the basement of my split-foyer house on the sofa bed, but the main bathroom was upstairs. Our basement bathroom always ended up being storage- haha. We were passed out in the way that only college students can be, when I suddenly bolted up in the bed. Katie turned over and said, “What the heck is wrong?! Did something happen?” I asked her, “Have you been up already?” and she said, “Yeah, I woke up a while ago and went to the bathroom.” I jumped out of the bed and yelled, “The water’s running!” She didn’t really understand my freak-out, but I later explained the well water situation to her. That year we were also in water advisory for a drought, so I was on especially high alert.

I can still hear the water running at any time and from anywhere in any house I happen to be in. It’s a sickness. A few months back, I heard our water running in our bathroom toilet and asked Chris if he’d heard it. He said he had heard it a few times, but didn’t realize it was happening as often as I had noticed. Eventually, the flapper would leak so much that the water would full on run into the toilet bowl. The trickling made me in.sane.

This past weekend I decided to do something about it. This may be the first (and only) time we use personal spending money on toilet parts. Chris ran out to Ace Hardware Saturday evening and bought this handy-dandy Dual-Flush Converter: the HydroRight.

DSC_3762

I had seen it recommended on Young House Love a few years ago, but didn’t have a good excuse to replace my toilet parts until my flapper started trickling. How many times in life can you say that your flapper is trickling? Too few, I say.

So. We started with the toilet looking like this…

DSC_3758

Just a regular old tank, fully equipped with an empty flower pot because I killed a succulent. Yes, an un-killable plant.

DSC_3759

Then, Chris took the tank lid off and sat down to look inside. This happened. I laughed out loud and he couldn’t get up fast enough to stop me from taking his picture. Did I mention I can’t wait to repaint this bathroom based on my new moodboard from the diy nurse?! Because I can. not. wait.

DSC_3767

So, he sat backwards on the toilet and I read the directions to him. It’s pretty easy, almost as easy as replacing a regular old flapper. We had to make a few adjustments to the float that monitors the water level because its “default” height was the same as our tank’s water level and we took a few test flushes to adjust it and make sure we had enough water for the #1 flush. After 10 minutes of playing around with the water level, we had a dual-flush toilet! Yes, friends, that’s right. One flush for #1 and another for #2. I am so stoked about the possibility of water savings, I’m about to install one in the roommate’s bathroom.

DSC_3768

And honestly, the little button is really cute. I was scared the tank’s lid would sit differently because the button seemed higher than the lever, but voila! It works! This is so dumb, but I am really so excited about this joker. Being able to say that my flapper was trickling was just an added bonus. 🙂

DSC_3770

Any water- or money-saving tricks up your sleeve this spring? We would love ALL the money-saving tricks we can get!

Which came first, the chicken…or the egg basket?

Every year, we make a lovely pilgrimage to Pennsylvania with my grandparents. I first went on this trip in middle or high school and I was obsessed with vintage handkerchiefs. Yes, I have a bazillion. No, they’re not doing anything cool. Yes, I should really get on making something cool with them.

Anyway, as I grew up, I became obsessed with other things (formica top tables, anyone?) and started going on this trip as an adult with my own little envelope just for these goodies. Since then I have bought a bazillion insulators, some old bottles, blue Mason jars, old cameras, and other things we use and love around the house.

As nervous as I am to admit this, I think this year was our best haul yet. I’m sure I’ll be blogging about many of our finds over the next few months because I just want to make them all functional and display them right. stinking. now.

Last year, I came back with a b-e-autiful yellow egg basket. Yellow is my favoritefavoritefavorite color and it’s in nearly perfect condition. My blue Mason jars look beautiful in it, but I really wanted to make something out of it. I really wanted a light.

This year, my hunt was for another egg basket that I could finally transform into a lovely little light fixture. I really love the yellow one and want to keep it with my blue jars. Well, apparently we aren’t the only ones because not only did we find baskets, we found them for prices WAY higher than last year’s. We finally found a really nice white one in SUPER great condition. I was afraid for it to be too rusty because some of the wires in the egg baskets that were umm…more well-loved(?) was kinda sketch and eaten all the way through and I wanted this to be a kitchen fixture. The white we found also happened to be the cheapest we were seeing advertised ($37, but I think we talked them down a few bucks). Either way, I knew I wanted to leave with one and it was perfection.

Now, I don’t know anyone with an egg basket light, but I figure pinterest might. I knew that I could make it into one, I just wasn’t 100% sure on the mechanics of the whole thing.

Enter 2 Little Superheroes and her DIY Egg Basket Tutorial. Feel free to read hers if you want more detail, as mine will be brief since hers was so bomb-dot-com.

We started with this ginormous (but lovely) fan that SUPER doesn’t work with our aesthetic.

DSC_3720

Also, have I mentioned that we have very limited counter space and EVERYTHING seems to end up on this lovely little table? And yes, that is a dress hanging from our floating shelf. Long story. Doesn’t it look like something Mary from The Secret Garden would wear? #humorme

DSC_3722

And here is my lovely little egg basket. Isn’t she cute? I love her.

DSC_3728

This is post-taking wires out of fixture plate and threading them through the egg basket hole. Then, we just threaded them back through the fixture plate once it was hung on the ceiling and attached to the box. No worries, we turned off the electricity…although that did take some serious luck because the previous owners jacked up our fuse box labeling. Annoying. **For anyone who’s wondering. We used the same pendant light as in Danielle’s tutorial, but in silver. It’s here, if you’re interested! I forgot to take a photo of the box and my husband is a rabid recycler- haha.**

DSC_3729

Aaaaaaaaaand here she is! I really considered tying up the handle with some fishing wire (so it wouldn’t look “ghetto”, as my husband called it) or with some cute twine to look more rustic…but then both the hubs & the roommate leaned over and got coffee without bumping their heads on it- so it stays! You will notice that the cord had to be swagged from the fixture box to a hook. Our fixture box is a) not centered, and b) super far out of the “nook” due to the way the HVAC ducts run from the vent. It’s annoying, but I really needed the basket to be centered and it’s less noticeable than I would’ve assumed. I mean, Country Living and HGTV aren’t coming to photograph my house anytime soon…and we’re looking into moving the fixture box sometime soon. Gotta get up in the attic and see what we’re working with. 🙂 DSC_3734

DSC_3736

Oooh, you can also see that we took Danielle’s advice and got the Edison bulb. It’s a LOT less bright than our fan’s light fixture, but I l-o-v-e love it. So I don’t care. Also, that second picture makes it look super crooked, but it really isn’t. I just couldn’t get directly in front of it with the camera. Yes, our kitchen is THAT narrow. …and don’t judge me for the Strawberry Daiquiri ice-pop kit in our window. We accumulate super weird (and hopefully delicious) things.

Anybody else making weird things into light fixtures? Weren’t these egg baskets absolutely made to be lights in a future life?! Well, baskets, that life is NOW!

pssssst! We were featured on 6 AWESOME blogs for their Monday Funday series! We are SO honored- it made our night/weekend/week/month! 🙂 Check these amazing ladies and their awesome blogs out! And…thank you SO much to Jamie for choosing our project! 🙂 

C.R.A.F.T., Uncommon Designs, Lines Across, That’s What Che Said…, Creatively Living, An Extraordinary Day, and Really Awesome Costumes

2013: Upstairs Closets

Last year, we made (and I never blogged about) a cloffice (closet office). It’s one of my favorite things in our house. One day I will explain the creation/inspiration for said cloffice, but today…I am writing about closets, in general. Toni, from A Bowl Full of Lemons set an organization challenge this week of closets, so I’m here blogging about our three very different closets: our cloffice, our master closet, and our linen closet. Would I say that any of these three are *completely* finished? No. Are they all FAR more functional and actually pretty enjoyable? Yes. 

#1- The Cloffice


It’s pretty simple in that…I love it. There are a few wire shelves to the left (that came with the closet) as this room is relatively small. This is also a terribly bright picture, but the wall is super navy and I super love it. I super hate the chair. We’re saving up for a nicer one…maybe acrylic? I want it to stop stealing the show from my navy wall. This stores all of my gift wrap, old magazines, tissue paper, random small crafty things, and, obviously, our files. I also copied Toni’s original filing system[I couldn’t find the link but it’s all over pinterest] and it made my heart so happy over spring break (last year) that I probably could’ve cried. That’s serious. 

I should write more on how amazing this is, but for now, the pictures are on my hard drive and it’s not hooked up…so I’m moving on to…

#2- The Master Closet

Truthfully, our “master” isn’t billed as the master. The boxier room downstairs has an attached bath. It also has a smaller closet…with the water heater in it. This one has a double closet and it has been my room since my mom purchased our house when I was a sophomore in college. It has been different colors (on its way to a new one) and had many different sets of furniture and arrangements, but I love this room best. We redid our closet system in April 2011…after my husband’s side fell. down. It has worked pretty well. It’s still not huge, but that’s the nature of the beast. Our upstairs bedroom closets like this one and the cloffice have slanted ceilings because they begin the transition under the eaves of our house. It’s kinda weird to explain…maybe one day it will make sense and I’ll have a picture of our oddly-shaped home. 🙂

Basically, this closet kinda stopped functioning so our room looked INSANE. Seriously.
Exhibit A:


 This was the point where I took everything on the floor (ie: should go in the closet) and threw it all on the bed. That has ALWAYS been how I clean my room. I make it so that the room “looks” clean-ish and then I go through the stuff on the bed. Typically, it works (as I’d like to get in bed at night). However, in college I slept on a pile of laundry for a few days because I just didn’t. feel. like. folding. 

This is what the bed looked like from the other side. WHY DO I HAVE SO MUCH CRAP?!?!?!?!?! Seriously, almost none of this is my husband’s. In fact, none of it is his. 


 This beautiful clear space on my side of the bed was my motivation. It still looks this way days later, thankyouverymuch.

 True confession? This part still looks slightly similar. The stuff closest to me & the camera needs to be donated/consigned and I just haven’t been home during daylight hours to go through it the rest of the way. #comeonsnowdays2013!


See? I told ya we’d sleep here that night. How we sleep without moving the frames/canvas to adjust to center (to align with our mirror), I will never know.


This is the bag of donations. You’ll notice they’re mostly my husband’s. Someone keeps losing weight. The only weight I’m losing is the half-ounce of nail polish that has clearly disappeared from my toes.


Then, I look into this beautiful closet and I don’t care that my toes are chipped or that I won’t be able to work out until April (#lifeofanOdysseyoftheMindcoach) because my closet is SO PRETTY. Things are organized my sleeve-length, and then rainbow order. I do keep all jackets to the right and dresses to the left. Also, in the right side there are probably…7-10″ of space. I hung some 3M hooks with my 4 big purses, which house all of the little ones. It’s splendid.

 Please don’t judge the crazy curtain situation. I hung one of two panels on his side of the closet to see if I liked the no-door, curtained look. I do. I just haven’t gotten around to hemming all 4 or hanging the other 3 panels. Soon. And very soon (that’s an inside joke for you, Mom…and anyone else super familiar with the Baptist hymnal).


This is my husband’s side. See all of those empty hangers? They were full FIVE MONTHS AGO. I tell ya, Insanity works. My man is looking mighty fine and diminishing by the day. He’s so healthy I can’t stand it. If he has to give away any more shirts he’s going to be so naked nobody else can stand it.

…………………………………………………………………………………………………………

And on to my newest addition to the 2013 Cleaner Closet Campaign, the Linen Closet! Hooray!

So, I went to Target at 10:20 p.m. on a Monday. I just…I had to have some baskets. I got the lovely y-weave and (apparently) I got the fall/winter ones that they are phasing out because 5 of them were on clearance- SCORE! I bought 5 of their large size and 2 of their mediums in white. Sidenote: The spring ones are also teal, but they were slightly lighter by comparison in person. Also, we used red ones for our laundry room and the ones now are a tad more…fluorescent? It’s hard to describe, but noticeable since I already owned some. 

I also bought one of the little tiny Sterilite drawer sets for things I wanted to corral. I hit up the dollar bins because WHY NOT and found one other little box I didn’t even know I’d use. 

This closet performs many duties: sheets, towels, medicine cabinet, paint supplies, extra throw pillows, beach bag [not pictured=not organized- sorry, beach bag]. I just needed to corral items in a way that would make sense. Here’s where we started:


There are few more bed pillows that get stacked on top, but they were used this past weekend by some guests, so I haven’t gotten them put away yet. Otherwise, this is pretty much what it looked like. OH, it did have a basket with ALL of the “medicine cabinet” related items. They were all thrown in with extra soaps, travel stuff, random lotions (kids give the best and worst teacher gifts), aloe-type stuff, back scratchers, etc. That was in my living room floor but came from the shelf that has the…smoke detector on it. You’ll see the basket filled with trash later.


Yes, the lighting is terrible. No, it really is that ugly. Brassy knob. Builder white? beige? paint. I have not painted, but now that it’s organized, it will be much easier to get everything out of here and paint it up one weekend. 

 You can see that I tried REALLY hard to utilize baskets, but I had random ones and some didn’t really fit or you had to pull them both out to get to one…
now I have THIS:


Top Shelf: 
-still pillows (and the zip-up picnic blanket/pillow thingy)
Second Shelf: 
-basket on left: hand towels/wash cloths
-drawers: medical tape, ointments/creams, floss/oral ointments, bandaids, Breathe Right strips, sinus/allergy meds, thermometer
-divided organizer on top of drawers: small hair rubberbands (the plastic-y ones I use for special teacher-spirited hairdos), extra contact cases
-basket on right: “medicine cabinet”, travel-sized stuff, extra glasses/cases, a few bars of soap & body butter, a box of unopened Prilosec, gauze/Ace bandages, handheld back massager, and that little thing from Avon that gets the pills off sweaters- what’s that called? Sweater shaver?


You can probably guess that the third shelf is towels. We have 2 that go on the left (in the wash) and guest towels are in that basket in the middle.
Below that, the left basket is extra sheets. When we travel and bring sheets we have a set for a double bed and a set for a king. We use them more than I would’ve anticipated. The set in the middle has never been opened, but one of our current sets is wearing thin. The basket on the right has our current sheets that are in rotation.
Bottom shelf left basket has cleaning supplies for the upstairs, a make-up bag I can use for bottles & things during travel, and the right basket is where we keep random electrical things (extra smoke detector, pop-up lights & bulbs, my husband’s knee brace, heating pads).

One last look! Top!

 …and bottom!


 The beach bag will fit perfectly in the middle of the floor between those paint cans! Booyah!

The basket below WAS my “medicine cabinet” basket. That is now trash/recycling, minus the peroxide which is going downstairs to make laundry (armpit) pre-treater.


This make-up bag is a little less effective for me, but I’m going to see if I can’t change my travel habits with packing that kind of stuff and keep it in my closet with the matching garment bag. I hate splitting up a set but I do know some really good consignment places.


And this will ALLLL be going to Freecycle. Freecyclers love beauty products because they’re often expensive. If someone has extras of something you use, might as well get it for free!


I’m feeling MUCH better about my life in our closets. It took less than a day to construct our cloffice and less than 2 hours to organize the other two. Definitely a do-able night or weekend thing! I think our life will run MUCH more smoothly with our closet stuff organized…and I can’t wait to get some bookplates/labels for those linen closet baskets! 

Our space-filling project for under our shelves is coming later this week! 🙂
A Bowl Full of Lemons

Manic Monday

I promise I’m coming back this week! I know that if we’re friends on facebook, I promised a post today…but…

-a meeting started late
-it’s POURING
-it was still dark at 8 a.m.
-it was dark by 2 p.m.
-no recess today
-moved 4 kids’ cards to yellow (that hasn’t happened in awhile)
-found a HUGE scheduling snafu that I was responsible for
-frantic parent came in to the office…at SIX P.M.
-it’s POURING
-it wasn’t the 70 degrees they said it would be and…

did I mention it’s pouring? ugh.

Anyway, I have a serious case of the Mondays but some things that are getting me through…

Living room progress:

My above-the-buffet project. 🙂 Thanks to my husband for working on it while I babysat SO MUCH this weekend.

SO much better than this…I think it’s coming together!

aaaaaaaaaaaaaaaand, I’m doing this. WHAT? Most people who read this *probably* don’t know what Haven is…but it’s a HUGE HUGE HUGE DIY blogging conference held in Atlanta, GA. I mean, almost all of my favorite bloggers were there last year [Young House Love, The Lettered Cottage, Bower Power, Ana White, and Sarah from The Ugg Duck…to name a few…]. So yeah, it’s a big deal. I know my blog is but a baby blog. I call it “my little baby blog”, but I feel like I could really grow and be supported and encouraged at Haven. So, I bit the bullet. I’m super excited to be rooming with a fellow Virginia-blogger, Caroline from the diy nurse! Hooray! I can’t wait for August! 🙂
I’ll be back with the “painting project” for the living room tomorrow- I’m hanging it RIGHT now!


Brace Your Shelves!

Sorry. That is an inside joke. I’m not sure why. My husband and I said it once? to our roommate? maybe? We’re losers. Sorry.


Another warning, this post has a bajillion photos. Apparently, that’s what happens when you buy a new camera, supplies for a project, and have months of time on your hands. (I take too long to complete projects.)


Alright, on with the show! This all started in October when my wonderfulfabulousamazingsplendidromantic husband bought me a buffet for my birthday. Now, this isn’t truly a “buffet”, but it is two pieces: one old TV cabinet and one serving piece/sideboard. However, when we saw them in the consignment shop, they were side-by-side like one cabinet and I fell. in. looooooooove. For real, I did. This was the week before our anniversary and, when we got anniversary cards with cash, I begged him to come back to Newport News (we were visiting family) and go find the cabinet again. And it was gone. I almost wept. I’m not typically *super* emotional, but I LOVED this piece and I was devastated. Nothing seemed right. 


Fast forward 2 or 3 weeks and I started craigslisting. I REALLY wanted to find a cool vintage buffet. I finally found one and the sellers were AMAZING. I’m talking, drive-an-hour-for-you-just-to-look-at-it, amazing. Well, hubby got all squirrelly and started fussing at me.  See, he had also asked about celebrating my birthday (THE BEST DAY OF THE YEAR- only 309 days, by the way) and I said…”ummm…is yesterday too early?” He was not amused, said we should just go get my gift now, I said “no” because he gave my anniv. gift early and kicked himself. It was weird. If you knew him, you would know he is the most even-tempered person EVER. Our roommate actually said, “I didn’t know he could get frustrated until I moved in and saw you frustrate him.” Our roommate has known him for over 10 years. I bring out the best in people. That being said, the next day he got REALLY weird and said, “We have to go to my parents’ house.” I said, “Does this have to do with my birthday?” (12 days early). He was not amused. So…we went in to his parents’ home and he asked me to help with something upstairs. What did I find?! MY BUFFET!!!!! (I, truly, have the craftiest, trickiest, most thoughtful, worst secret-keeping and worst-at-lying husband in the whole world- love you, babe.)


Here she is in her trial-run, partially-set up state. I love her. She’s slightly less orangey than this picture shows, but no less beautiful. 
 This got me thinking…my husband hates it when I do that. I reaaaaaaaaaaaalllyyyyy needed something in ALL of the space above the buffet. 

SOSOSOSOSOSOSOSOSO MUCH SPACE! Seriously, I could not handle it. 
(an aside: nothing about this looks remotely similar today…except the standing globe to the right)
 
I got on ye ol’ Pinterest and looked at some old DIY pins I had pinned. I found a tutorial from younghouselove (not surprising) and Ana White on building floating shelves*…I started brainstorming. Then, I looked at the things that did not fit into the new buffet from the old china hutch (to the left two photos above…from Ikea…Bjursta collection?). The #1 misplaced item was…wine glasses. We have 14. They had nowhere to live. So, I did what any normal pinterest-er would do…I looked for a tutorial for building wine racks! I remembered that Katie Bower had retrofitted some Pottery Barn shelves with wine racks, so I googled those. No dice. Then, I bit the bullet and found a tutorial for building your own wine rack. 
 
Disclaimer: Nothing about these shelves is perfect. These wine racks? Not perfect. But, they were a labor of love so, I love them like I love my 2nd graders with their weird grown-up front teeth and tiny baby teeth. Awkward, quirky, loveable. 
 
Onward: Let’s buy supplies! Truthfully, I didn’t keep receipts, but this ended up being WAY more expensive than the tutorial. I do NOT think this is the fault of either tutorial. We had fewer supplies on hand, so costs rose more than we anticipated. Here is our pile of supplies on our dirty (now gone) carpet, next to the old trunk of books (that were all free) that I still haven’t gone through. Open & honest here. 


Basically, we followed the tutorial and then…sat the braces and the shelf sleeves in the corner while we worked on our floors. For. Ever. (real time: less than 2 months) Finally, floors were done! Hooray! [The joy cannot be contained by this post and will be posted at a later date when I’m done with the grieving process and can release my bitterness and hatred at a “3 week turned 6 month” project.]


That darling husband of mine leveled the first brace (I held on, he screwed in- oh. man. so. funny. sorry.) and we had a brace! Hooray! We screwed into as many studs as we could [still inappropriately funny], but some of them were in strange places behind our little 11.5″ cross bars. That made it complicated, but we worked it out. Fortunately, after the first one or two screws, we were able to leave it hanging with the level and he could finish drilling while I took pictures. [Nothing about this makes me stop saying “That’s what she said.” Nothing.]
 
We decided to put the lowest shelf 24″ above the buffet…and then I realized that 9″ tall wine glasses would be hanging from it. So, we went 33″ to compensate. Does it look too high? Definitely now. Will it look better? I think so. Ideas are on the way.


Keeping it level because I’m neurotic. 


Then, it got dark, but we kept on going. Warning: the pictures will look horrendous from here on out. Our lamps are THE. WORST. EVER. I also don’t really understand 90% of my camera, so, bear with me. I’m working on it. 🙂 We had to make some adjustments from our original brace #2, but we were able to fix it so that it would hang correctly with a new 1″x 2″. 
Then, we prepared for the moment of truth: sleeve-fitting. 


IT WORKED! IT WORKED! IT WORKED!!!!!!!!! Yes, I was jumping up and down. Yes, my husband was sweating bullets. No, I did not cry. 
Meanwhile, back (in Gotham City?) in the floor, I was wood-puttying some stray holes in the second shelf-sleeve, re-sanding, gluing on wine-glass brackets, and any testing out the wine-glass-holding capabilities.
Success.
We let it dry overnight (while I was painting my mirror– woop!) and then it was ready to hang!!!!!!! We did consider putting some additional screws in the wine glass holders, but we kept testing them (and testing and re-testing) and decided that they’re very secure. God forbid anything happen, we’ll put out a plea to donate to the Keep-Jessica-from-drinking-Moscato-from-plastic-cups campaign.


We put the bottom sleeve on and…ALKJDFLKSJDLFKJLKJ!!!!!LKSJDFKJ!!!!!!!!!!!
IT WORKED! Seriously, at this point I considered weeping. Also, check out those sweet branches that are in a floor vase to the left…thanks for your end-of-year sale, Target!


Yup, my husband works best in a tie. I am too anxious to finish projects when he comes home to let him change clothes. 
Now, I’m with $herdog on this, styling is THE BEST part. I wanted to keep things *somewhat* wintry with blues and silvers since I hate taking down Christmas stuff and wasn’t ready to say goodbye to my mercury glass owls. 


With buffet: Try #1
With buffet: Try #2 (and mostly how it is still). Please, feel free to hate on the glass head. EVERYONE hates on the glass head. It remains one of my favorite things ever purchased in the whole world.
 
I instagrammed a photo of this and someone said, “Your shelves look like something off pinterest.” I seriously have never heard a bigger compliment. 
Let’s address the height issue of the lowest shelf. I don’t LOVE how much higher it is. Those globes look way small here, but they’re regular size and have looked too big on every other piece of furniture. However, I think about hosting Thanksgiving last year and how we had tall beverage dispensers that wouldn’t fit with the lower wine glasses. I also think of the possibility of sideboard lamps. SO, I think we have something here to help shortly. 🙂
 
All of this being said, it just encouraged me to try more projects…so, this week I came home to this guy (I hope he’ll help with the empty wall space under the shelf!)…I can’t wait to get him finished and show him to you! 🙂
 
Anybody else in blogland creating something for the first time and in love with it?! Tell me all about it in your comments! Thanks for reading! 🙂
 

*The only design difference between ours and Ana’s, besides that she is an incredible carpenter and we are not, is that our shelves come in at a total of 66″ instead of 72″. The buffet was not that long, so we tried to center it and have the shelves be a smidge smaller. Some quick math solved our dilemma. We like that they’re space-filling without being super overwhelming with the buffet.

This project is linked up at A Bowl Full of Lemons: One Project at a Time!